This getting started guide will walk you through the basic necessary configuration of the plugin and show you how to set up your first Ansible project in IntelliJ.
This tutorial requires OrchidE version 2022.1.5 or newer.
A general overview of the IntelliJ platform can be found in the Help of IntelliJ.
First you need to install the OrchidE plugin and accept the license terms. (➞ Prerequisites)
The plugin OrchidE can be installed like any other IntelliJ plugin via the IntelliJ Marketplace:
- In IntelliJ, open the Settings and go to Plugins.
- Verify that the YAML plugin (from JetBrains) is installed and enabled.
- Search for OrchidE and install it. After that you will need to restart the IDE.
- For Community Editions, you will be prompted to also install the JetBrains Marketplace plugin. This plugin is required for all paid plugins of the JetBrains Marketplace.
- During the restart, you can start a 30 day trial period or provide a JetBrains user id that has a valid subscription for OrchidE.
- After restarting, open the Settings again and go to the Languages & Frameworks ➞ OrchidE ➞ OrchidE License section. Accept the license conditions at the end of the license text.
- Confirm the setting with Apply and continue with the other settings.
OrchidE has several semantic parsers for Ansible playbooks, roles and variable files.
In order for OrchidE to load files with the correct parser, the root folders to playbooks, roles and inventories must be configured.
Without this configuration Ansible files will not be displayed correctly and common IDE features will not work.
Open an existing project with Ansible files or create a new project.
New projects:
- Create folders for your playbooks, roles and inventories respectively
 <project>
 |-- inventory
 |-- playbooks
 |-- roles
Instead of playbooks you can also take the root folder of the project.
Configure the mapping of your project folders to Ansible playbooks, roles, and inventories:
- Open the IntelliJ Settings and go to Languages & Frameworks -> OrchidE -> Ansible Folder Mapping.
- Select the checkbox ‘Use Ansible Folder Mapping settings’. (Default as of version 2022.1.5 if no older settings exist).
- Add the folders for Inventories
- Add the folders for Playbooks. Take the project directory if no extra folder for playbooks is used.
- For tasks (via include_tasks) and variables (include_vars, vars_files) inside the playbook folder you can define further exceptions.
- Add the folders for Roles. Include the project directory if the project consists of only one role and no extra folder is used for the role.
- For playbooks (e.g. in molecule) and variables inside the roles folder you can define further exceptions.
- Add exceptions (global ignores) for YAML files that are not Ansible files - e.g. configuration files for CI systems.
- Apply the changes with the Apply button
Tip: Always verify if OrchidE recognizes your files correctly using the file icons (after complete configuration, restart of IDE necessary):
 playbook file
 tasks file
 variables file
OrchidE comes with a small set of Ansible Galaxy Collections in the base installation to provide code assistant features.
To get the full scope of modules of an Ansible release for syntax highlighting, code completion, navigation, quick documentation and various inspections,
an extended package with Ansible Collections and Meta-Data has to be installed.
An up-to-date collection of the most relevant Ansible Galaxy Collections can be installed directly from the IDE, packages for specific Ansible versions need to be installed
be installed manually.
Installation of the package with current Ansible Collections.
- In IntelliJ, open the Settings and go to the section Languages & Frameworks ➞ OrchidE ➞ Extension
- Configure an empty directory for the location.
- Check if new updates are available with the link ‘Check for updates’.
- Start the update with ‘Update definition file’.
- Apply the settings with the Apply button.
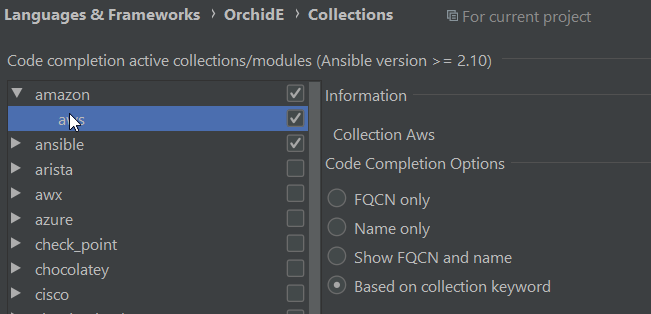
- Go to the section Languages & Frameworks ➞ OrchidE ➞ Collections.
- Deselect all collections you do not need.
Optional - code completion settings
It is recommended to deselect all collections that are not used. This increases the clarity and performance.
 .
.
Set your preferred variant for Ansible module names (select Collection ➞ options panel) to be displayed during code completion:
- always “full qualified collection name”
- always only the module name
- always both variants
- based on the listed collections in the meta file (for listed collections the FQCN variant is not displayed)
Apply the setting and close the Settings dialog with the Ok button.
Exit the IDE and restart before editing your first Ansible files.
